Presenting Thelonious:
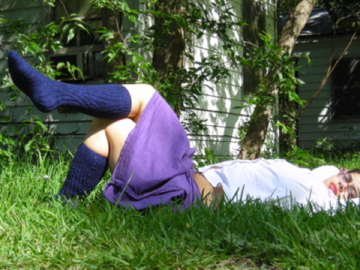


Yep, they're done! I finished them a couple of days ago, but I've been too swamped to post about them yet. I really like the way they turned out! They're warm and comfy, but fit snugly and aren't too bulky. They'll be perfect for the slightly chilly early spring/late fall days (but not quite as perfect for a warm day in late spring in Texas). Also, isn's my family's backyard pretty? I can't tell you how nice it was to take pictures in real sunlight.


(click for bigger)
Here's the specs:Yarn - 2 skeins of Mountain Colors Bearfoot (60% wool, 40% mohair; 350 yards) in purple mountain. The yarn was really nice to work with. It was sightly thicker than the sock yarn I've been using, which makes it perfect for knee socks, and the mohair makes it a little fuzzy too. I really love the colors, with the bright purple flecks poping up out of the navy.
Needles - 29" size 1 Susan Bates quicksilver circulars. They're kind of old and beat up, but hooray for magic loop! I also used a 47" size 0 addi turbo circular and a 39" size 2 addi turbo circular, but only for, like, a minute.
Pattern - Thelonious by Cookie A, I made the small size. The pattern's really well-written and easy to follow....but I made bajillion modifcations. I'm totally planning to make just a regular pair though! Here's what I changed:
- I knit them toe-up (using the figure 8 cast on described here) instead of cuff-down so I could work the calf increases as I went. This was the first pair of toe-up socks I've made, and I think I'm hooked. I always end up with way more yarn leftover than I thought I would and I tend to make my socks on the shorter side because I don't want to figure out how to add calf shaping before start the cuff. Two birds with one stone, eh? One thing I didn't change when I went toe-up was the heel. Cookie wrote the pattern with a ribbed flap heel, and I really wanted to keep it. I figured out how to work the toe-up heel flap from the Widdershins pattern, and just replaced the slipped-stitch heel with ribbing.
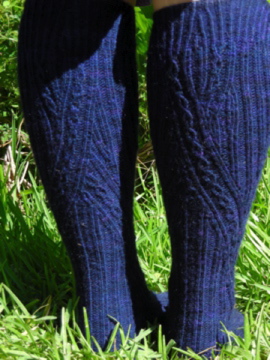
- As previously documented, I found that the original lace stitch didn't work well with this yarn or my gauge or wahtever, so I replaced it with a cable panel. It's nothing fancy, just a 4-stitch wide 6-row repeate of open cables:
row 1: k, p2, k
row 2: RT, LT
row 3: p, k2, p
row 4: p, then cross the two knit stitches in whichever direction you prefer (I had them mirrored), p
row 5: p, k2, p
row 6: LT, RT
- After knitting the leg charts as written (albeit in reverse), I wrote charts for the upper leg. I continued the cables up the front without moving them, but kept the back panels going based on the logic of the harts in the pattern until they crossed. I wrote two charts because I got all fancy and decided I wanted the crosses in the back to mirror each other. I am inordinatley proud of this.
- I worked calf shaping starting with the charts I wrote by increasing 1 stitch at the begining and end of each needle (placing the shaping on the sides of the sock instead ofthe center abck) every 4 rows. I put the shaping there because placing it in the back would have disrupted the crossing panels. Also, it makes a pretty leaf shape.
- When the sock was about 2.5" shorter than I wanted, I switched to size 0 needles and worked 1 x 1 ribbing. I initially decreased from 112 sts to 100 sts, and then decreased an additional 10 sts every 5 rows. I bound off loosely using size 2 needles.

No comments:
Post a Comment